Wednesday, August 27, 2014

Schematics....

I've decided that I want to get all the parts for this pan and tilt this week as I need to order some special connectors to fix a Mac Mini. So that means finally finishing my schematics! 
Lets just say that working with EAGLE is more interesting than I had planned. This design is by far the most complicated one I have ever done before, I'm sure that is affecting my results a bit as well.

I've got a lot of clean up to do on the left side of the schematic, but here is what I have so far. 
The whole thing is run with a standard ATMega328 chip - I could have gone with a larger chip with more memory but I think that the 328 will run well for now. Plus I have the same chip on an arduino board so it is a bit easier to prototype. I'm planning on being able to run 4 separate stepper motors simultaneously with the design; pan, tilt, slide, and an aux motor (focus?). It gives me a lot of room for expansion down the line. I've definitely got pan and tilt now but I plan to make a slide dolly in the future. 
I'm running Stepstick motor controllers, so a lot of the circuitry is already taken care of. Most of the trivial settings for the stepsticks are connected via shift register on the ATMega to save pins (functions like microstepping and sleep). Those are then connected to header connectors on the board. I've kept away from directly wiring the outputs of the stepsticks to the stepper connectors because there are many different stepper motor pinouts and I can connect them in a higher speed or a higher torque setting as needed. 


The board, however, is a mess. I'm running the freeware version of EAGLE so no 4 layer boards for me. :( This makes layout quite interesting as I've got to figure out where all of these gigantic through-holes are going to be as well as the smaller SMDs. Not to mention I still have to wire up the LCD display, a joystick controller, and a control button array. 


So just a brief update now. I'm sure my writing skills are awful when I post at midnight, but that's what you get today :) 
Hopefully more will come soon!

Thomas

Saturday, August 23, 2014

It's been a year...

I know, it's been a year with... nothing! And to complete that, this is another cliché post about me not posting a lot.

Well, some updates are in order! I am still working on my Pan-and-tilt project. It's been a year, and I just want to get it done. I think I am on the fourth? prototype now. I have sourced an enclosure, upgraded the design, and right now everything tests well. I am working on designing the PCB and writing the firmware.

You know those dampers I talked about in my last post? Well, I got some planning on completing the design, you know, a year ago (geez...). On SeeMeCNC I got a group order going, and after it ended, people kept on asking for them. Now I've begun selling dampers as a side-business. I don't make a lot of profit, but I enjoy the logistics so it's pretty fun.

3D printer has been scrapped. Yep, scrapped! After hanging around on 3D printer forums for a while I've decided that I just want a nice kit to start out with. I've begun saving for a Rostock MAX V2, but seeing as I will be heading to college in a year, this is a long term thing. I'm guessing it will be a year, maybe two, before I actually buy anything. It'll likely be the V4 by then!

I've started building a scale-model TARDIS as an HTPC machine. It will hold somewhere around 14TB of hard drives, which will contain my backups and 200+ hi-res movie rips.

I've expanded my electronics "lab" a whole lot, and gotten a lot more equipment. I have a Hakko hot air rework system, Hakko 888 soldering iron, and Hakko preheater. All of these I've gotten for really good prices on eBay. At least there is something my patience is good for!

I think I've gotten the entrepreneurial bug as well, as I have started an iPhone/iPad repair business! I plan on repairing 5-10 phones a week as I will be in school. It's no full time job, but I think it will double my monthly income as I have a part time job.

So, if anyone out there is listening - I'm back!

Sunday, July 14, 2013

Series: Building a 3D printer from 0 knowledge

Hey all, its been a while and I just wanted to let you know what I am starting on...

1 (Pan & Tilt update). My camera pan and tilt project is coming along well. Right now I am sourcing parts for the second (and hopefully final) prototype. I have been talking with some people at SeeMeCNC's forums about motor dampers in particular. I want this bot to run as quiet as possible, so I can use it for live, motion controlled video. However I have not had shop time so I have not gotten to machining new pieces for it.

2. As I said, I've been spending some time on the SeeMee CNC forums. It's a site dedicated mostly to 3D printers (and a few CNCs I think). Because I've spent so much time on the site, I REALLY want a 3D printer. Like really bad. Like a lot. So much. So, as of this week I have decided to start on an endeavor to build myself a 3D printer. Thing is, I have no knowledge of 3D printer design or anything. So I will be updating frequently telling all of you what I am learning designing my own system!

-Thomas

Saturday, May 11, 2013

Summer Project: Camera Pan and Tilt (Pt 1)

So as of late I found the Openmoco project. This project is full of people in videography and photography, as well as quite a few DIY'ers that create Motion Control devices. One of the popular things that they talk about and create are motorized pan and tilt devices for cameras.

I have been experimenting with time lapse photography, and quite like doing it. It lends a new perspective to how short time actually is.

Upon further search, some of these pan and tilt devices are used for time lapse photography (one of the popular devices is the Emotimo TB3). With them, you can create shots such as this -


It was the light from Jeff Morris on Vimeo.


I thought that being able to make those kinds of shots would be... awesome. Unfortunately, there were a couple drawbacks to the Emotimo TB3 (the only thing within my price range)

1. I couldn't use it for gigapixel photography (due to nodal point issues)
2. I (as a student) could not afford it.
3. It probably wouldn't be able to do real-time video very well due to the large gearing reductions.

So I set out to build my own.
One of the designs I found to be very helpful was Steven Brace's pan and tilt device, made from acrylic (stevenbrace.co.uk)
Well, the first time I tried building it using laser cut acrylic pieces and acrylic glue. As soon as I tightened the bolt with the gear, the acrylic cracked. Not good.

After that design was thrown out, I decided to base it more off the Emotimo TB3, using machined aluminum. I realized this was not going to work and also scrapped that idea.

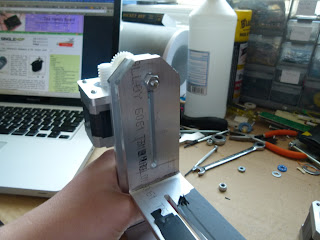
This is where I am today, with machined aluminum struts that are bent into an L shape.
The Arduino Uno running a Stepstick motor driver

The Double L strut design

Gearing


Secured with 2 nuts
This design, while still being my best so far, still has flaws, so I have decided to work on the (possibly) final design on this. Most of the major changes involve shaft diameter (my #10-32 shaft bends to easily and leads to gear slipping), as well as creating 2 plates for each "L" strut that screw together rather than my current design which is bent into shape. Any other things I can do also, such as quieting and reducing motor buzz and vibration, are being thought on also (but any ideas on this would be appreciated).

So still a ways to go, but hopefully v5 of this project will be my final design!

Here are 2 shots of the design in movement, one of the robot itself, and another from the camera view. 


Little brother in video :)

Tuesday, March 5, 2013

Check out this guy!

Hey all, just checking in as of now, been really busy with quite a few projects and not a whole lot of time to post stuff about them. Anyways- check out the music that this guy has made! I first heard this mans music in a movie theater while watching a trailer. It was the first, and so far been the only time I have absolutely fell in love with movie trailer music. A few google searches later (and a few annoyed whispers from the people in the theater because I was using my phone), I found out that the creator of the music was Nick Murray. Seriously though, check out his site. Some really good rock/electric music, as well as a lot of other random bits and bobs. But definitely some of the best music I have heard. Nick Murray Music

Friday, February 1, 2013

Collaborative playlists and how to make them

For a while now I have been thinking about editable playlists- more accurately, playlists that you have shared with people to edit, like on Spotify.

But these shared playlists seem a bit lacking to me. I mean, having a playlist that you and your friends can change is cool and all, but it could be so much more, which got me thinking even further into this.

What if we had playlists that were easily embeddable on a website or blog, that the general populous could rearrange and edit? It would become much more than a playlist, or even user interaction. It would allow you to get to know your readers- get involved with them on a deeper lever. It could also provide an easily viewable, always changing view into the social consciousness and current musical trends.

So- how to do this? Spotify is an easy choice for this, as it is used currently by millions of people, is free to download and use, and is linked socially.

To do this, you need the Spotify App, as well as an account with spotify or Facebook.

Once you have downloaded and installed the app, you should come up to the main screen, which looks like this:


Since I have been using Spotify for a while now, I already have a few playlists loaded...

Now- click on the "New Playlist" Button on the left sidebar. Create and name it whatever you'd like! I'll name mine "Social" for now :)


Click on the new playlist, and it should take you to a blank screen
This is where the fun starts!

Right click on the playlist and select "Collaborative Playlist". This is crucial, as it allows free editing of the playlist by others.

The playlist icon should turn green and have a little tic next to it.


Next, we need to get this thing shared. Right click on the playlist, and select "Copy Spotify URI". This will copy a URL into your clipboard, which links to the playlist. Paste this into a location on your website, and when a user clicks on it (and has the Spotify App installed), it will open spotify and the playlist. Of course, since this requires the Spotify app to be installed, how are people supposed to edit it? Well, simply placing a link and a short message noting the requirement of spotify, it can be handled easily. But we can make this even easier.

If we right click on the link, and select "copy embed code"- we can take this playlist, and display it publicly on a web site by posting the embed code on a webpage. So even someone who does not have spotify can see what songs exactly are in the playlist, and even play them themselves! 

Finally, we take all these and post them online. Sometimes this takes a bit of HTML finagling to get it right!  


So feel free to edit my playlist, and discover new artists, new genres, and new songs that you otherwise would not know!

Edit my Social Playlist!!


Saturday, January 12, 2013

Web-design Woes

Over Christmas break, as well as the past few weeks I have been updating sites for friends and family. The thing is, I wrote them all in HTML (all I was taught), and these people all seem to want to be able to edit their websites easily. Unfortunately, those over the age of 20 have ... more difficult time sometimes accessing servers and editing code. So rather than trying to teach them HTML (which might have been easier in the long run), I decided to update the websites. Unfortunately, what do I do? I was only taught basic HTML and CSS. I dont know HTML5 or CSS3, Javascript, JQuery, MySQL, PHP, AJAX, or anything else. What can I do with that knowledge? I decided to go with wordpress (sorry #blogger). Wordpress seemed like an elegant solution, as it had a wide user base and hundreds of plugins and themes. Little did I know that I would be busting my brains out this past month trying to work with it.... I started out thinking "This is easy!". That lasted for all about 5 minutes. Of course, my "clients" (I am all of 16, so I don't exactly have time, money, or the credentials to run a business), did not want their site layouts changed. So I tried to find a theme that fit best. I could find nothing. I searched on how to edit themes, and its all PHP. Something I do not know. So I get the "Thematic" blank theme. Seemed easy enough to edit the correct CSS files from the server. Well, I worked with that for about a week before realizing that it just was not going to work out. I needed something responsive, something future proof. That is where I am at now. At this moment, I am trying to create a responsive gallery page, complete with slideshow.. It is slow work, with a lot of queries as to the size of the screen and changing CSS based on that. But it is slowly working out. Maybe one day I shall show you the 3 sites I have created thus far. But, I have learned a lot about this, and I have learned a bit of jQuery, as well as the basics of PHP and how to create a custom wordpress theme. Well. Maybe I should start studying for finals... Yay PE final! (not)